LeEco Max 2, might be the best buy for the money you spend as for just above 200$ you get a Snapdragon 820 power house under a 5.7″ 2K screen in a very well crafted metal unibody. 4GB Ram is more than enough for all of us. LeEco’s bootloaders are easy to unlock and being a popular phone there are many developers who are developing or porting custom roms. Here we open the door to custom rom world. To be able to flash a custom rom ( or even a stock rom, we will do it in this guide) we need a custom recovery first and that custom recovery is Twrp mostly. These things are not so hard on paper if you are an experienced user. You just need to read carefully all the steps and use right files of course. What if something goes wrong ? You can end up with a hard bricked phone in your hands that can’t boot anymore, no sign of life. Why ? Because you messed up your phones boot partitions or its partition table. That failure can only be fixed if you have service rom of your model. I mentioned in my Xiaomi unbrick guide, for some models these roms are very easy to find, all “fastboot” roms for Qualcomm Xiaomi models are also service roms with all necessary key files to unbrick in them. For phones like LeEco Snapdragon models that service roms leak after a couple of months. Today we will learn how to unbrick/rescue our dead LeEco Max 2 X820’s that we finally have service rom in our hands.
Files to download :
- Max 2 Service Rom (don’t unzip)
- Flash Software
- Qualcomm Drivers
We won’t be using Qfil Qualcomm flasher this time, we will use a program called “FlashOne1.9”, I don’t know the developer of this software but a very big thanks to him that it makes flashing much easier than Qfil, it still uses inbuilt Qfil of course but with less clicks and easier GUI.
STEP 1:
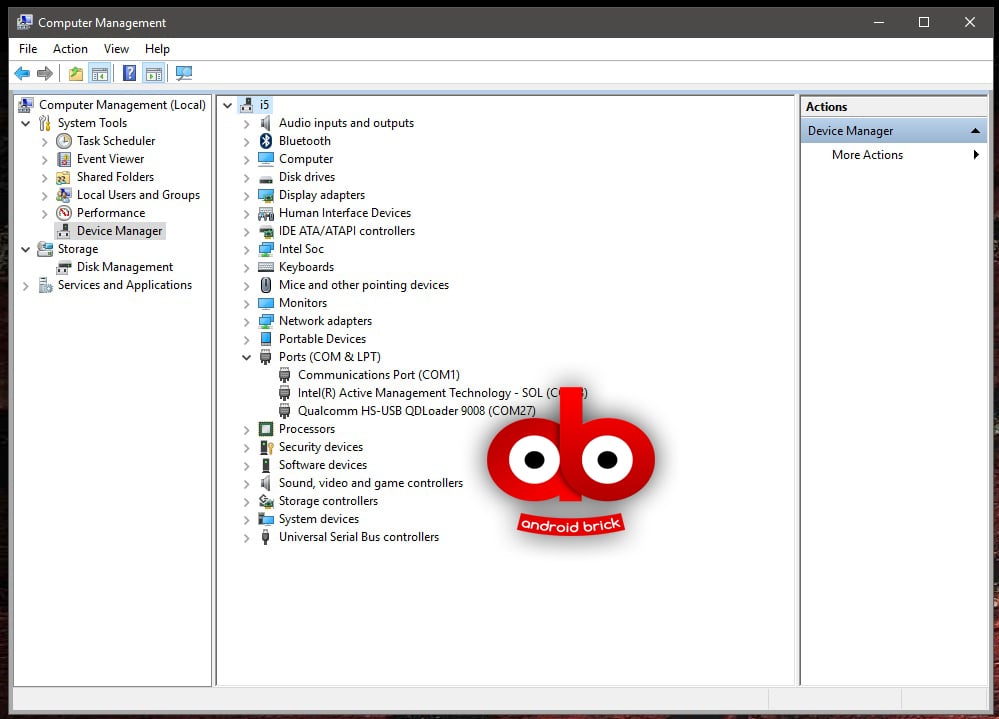
This rescue operation is not only for hard bricked Max 2’s, you can use this method to return of a stock “unlocked” developer rom too, your phone is booting but stuck at the logo or for any situation that you want to fix. Thanks to LeEco we can open our service/EDL port very easily with a key combination (even dead brick). Just press volume + and volume – buttons together while powering up, phone will get into EDL mode. After that step 1 is to install our Qualcomm QDLoader 9008 driver, it’s a signed driver so no need to disable driver signature of Windows OS. Just double click driver package,

Choose WWAN or ETHERNET in this window, it’s not important which one to select, and finish the installation. You should see your Qualcomm QDLoader 9008/EDL (emergency download) port after under “ports” tab in your device manager. It is COM27 in my example.
STEP 2:
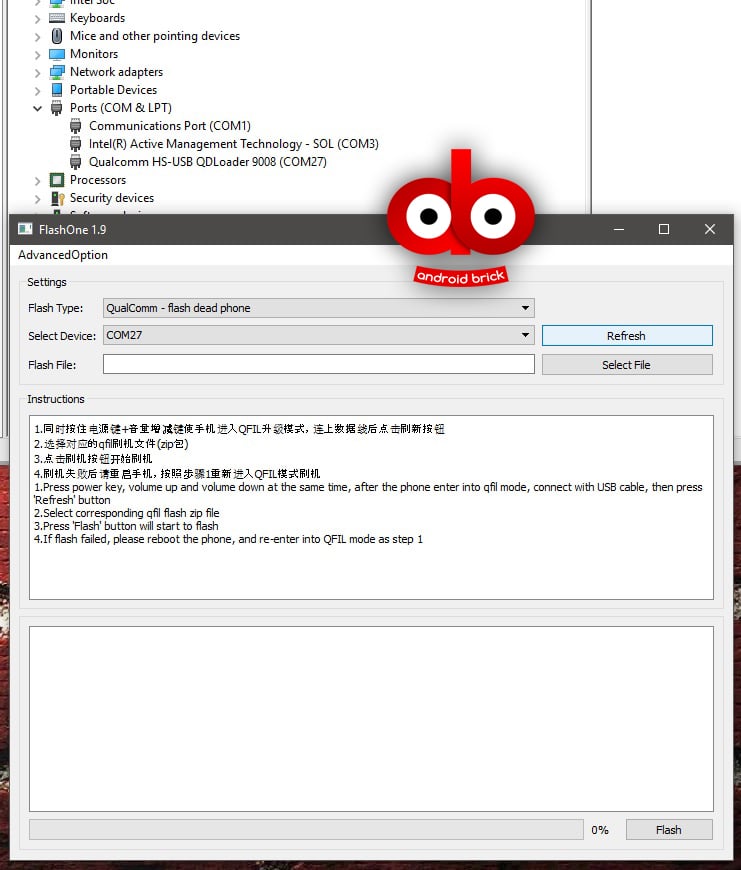
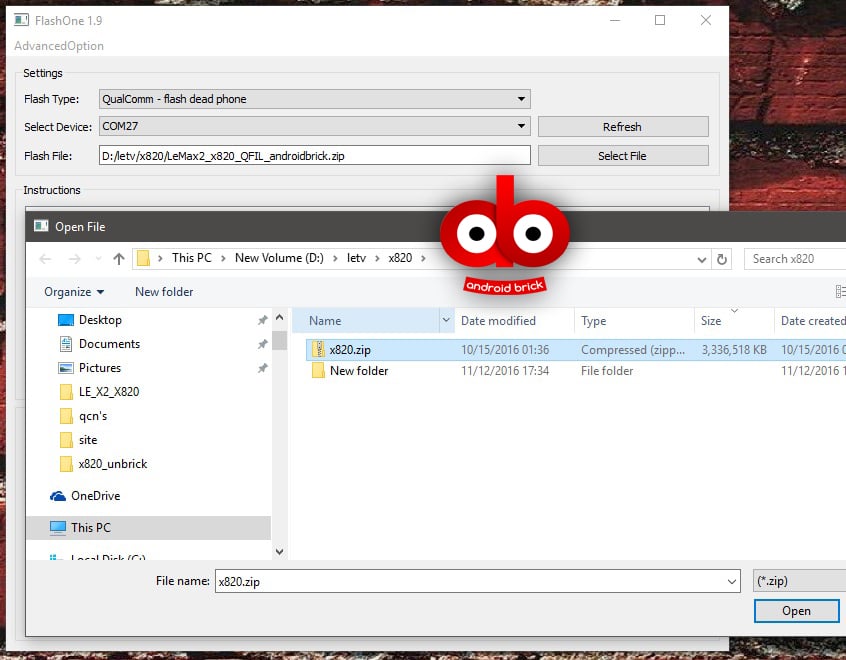
Unzip FlashOne 1.9 file that you have downloaded anywhere you want and double click the “main.exe” inside the folder. First, choose “Qualcomm – flash dead phone” from the drop down menu next to “Flash type”.
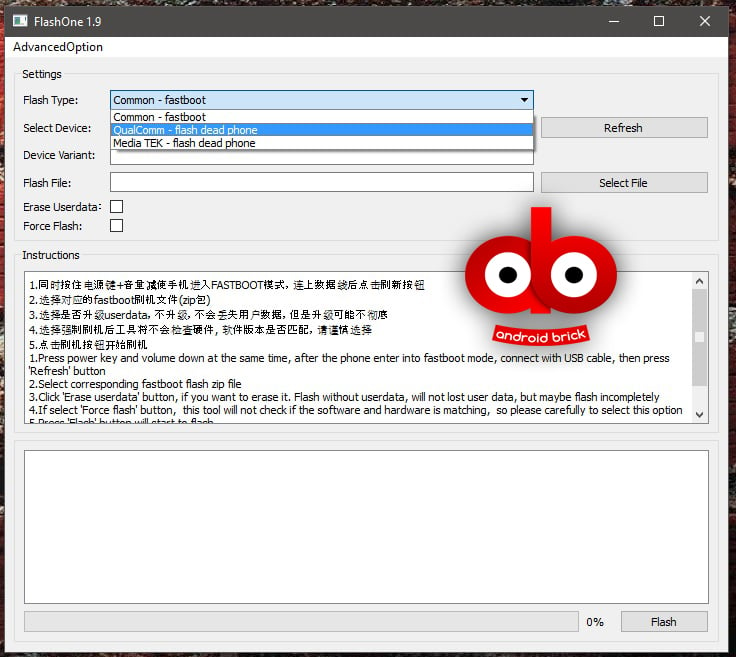
Then click “Refresh button” next to “Select Device”, your 9008 port will show up.
Next, we will browse for our Qfil/service rom by clicking “Select File” and choose the rom file you have downloaded before, no need to unzip it, the flasher will do it.
After everything is set up under “Settings” we are ready to click “Flash” button.
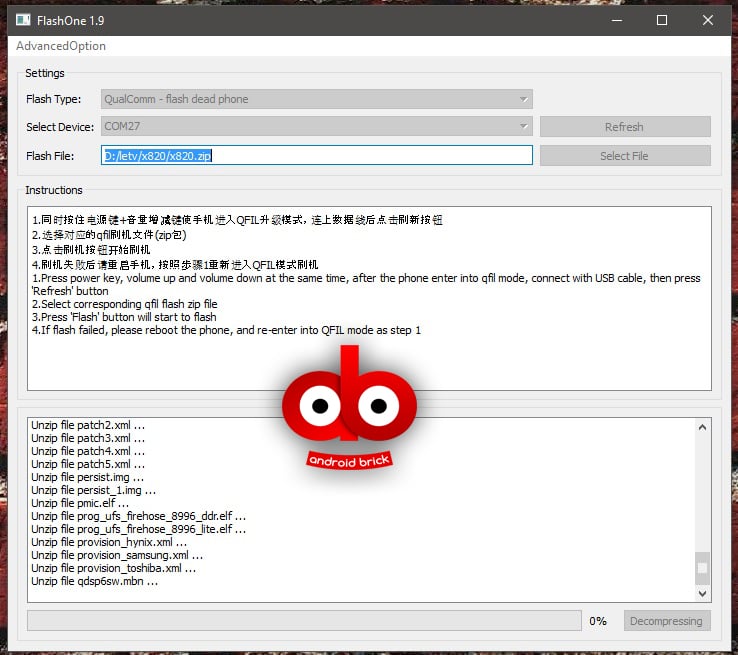
After you click flash button, FlashOne will start to unzip the rom, this will take minimum 10 minutes or more depending on your PC’s power, so you are free to go and make a coffee in between, or your cup of Earl Grey if you are a tea guy like me 🙂
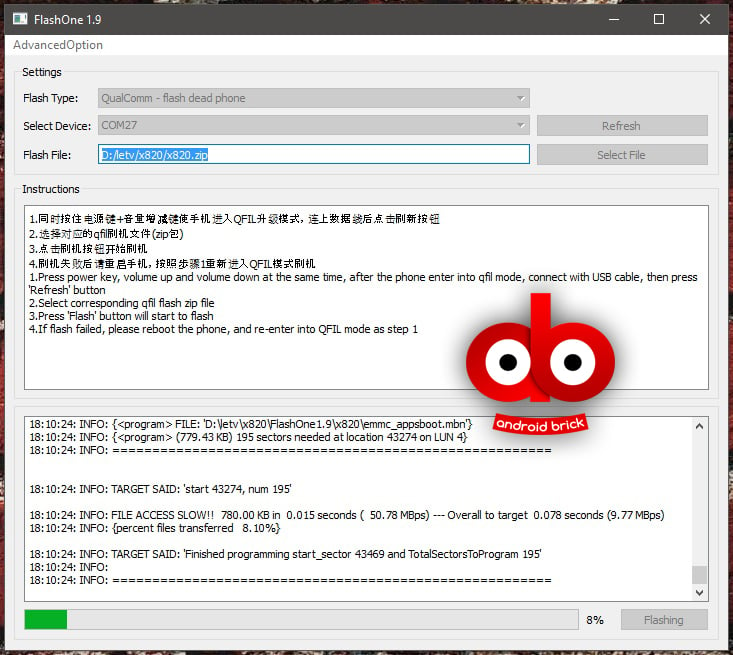
After decompressing is done, the actual flash procedure will start.
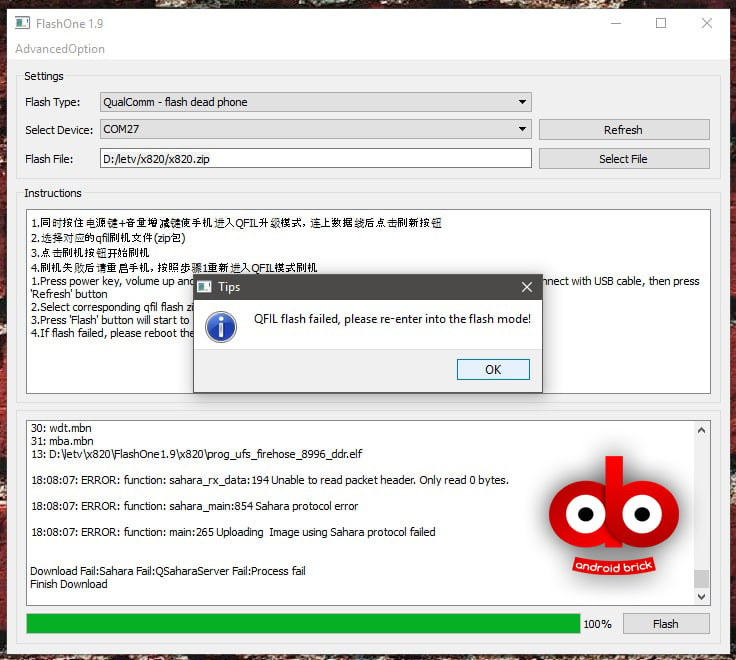
If you get an error like this, just put your phone into EDL mode again by pressing both volume buttons and power buttons (hear the USB unplug and plugged sound), then click the flash button again, choose “not to unzip” the rom file this time because it’s already done.
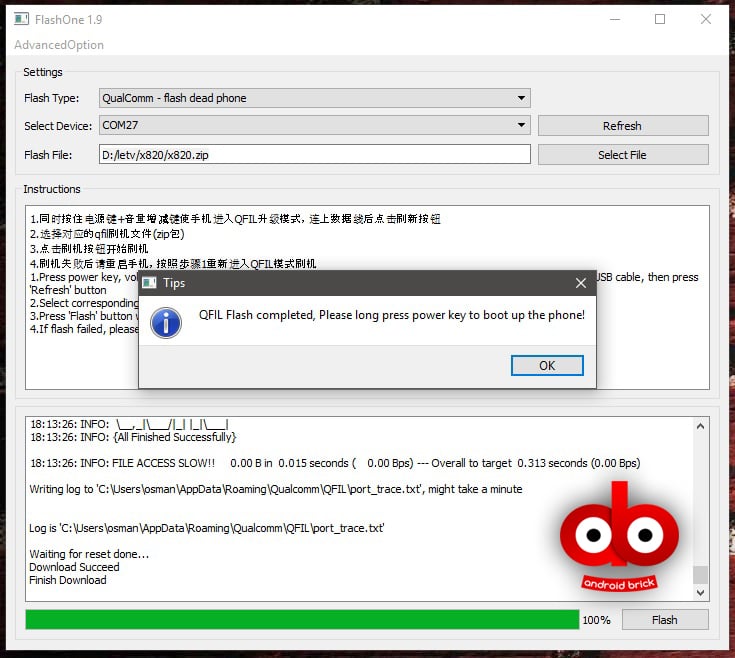
Done! Wait for about 10-15 seconds after you see this message, if your x820 won’t power itself and reboot, do as the message — long press power button to reboot it manually.
Your Max 2 will boot with a developer version of EUI, with an unlocked bootloader.
STEP 3:
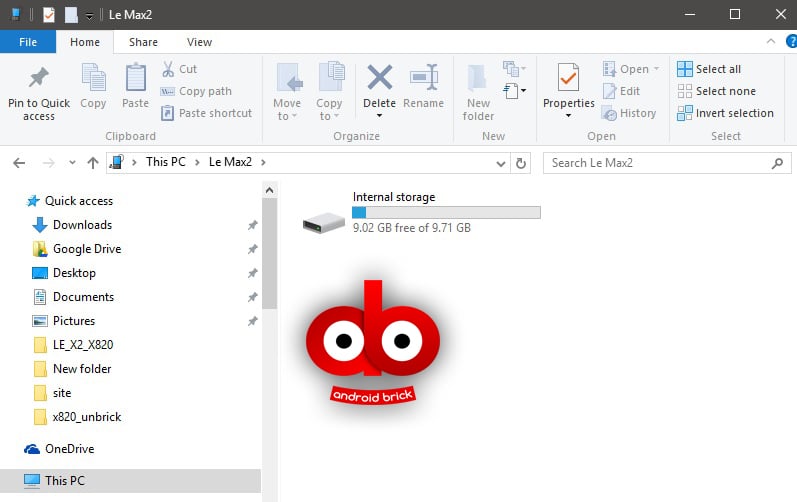
After your phone boots, you will see that its storage is abnormally 9.71 GB, to fix this just factory reset your phone choosing the option “Format Virtual SD card”. The File system will be restored to normal values.
STEP 4: (Optional)
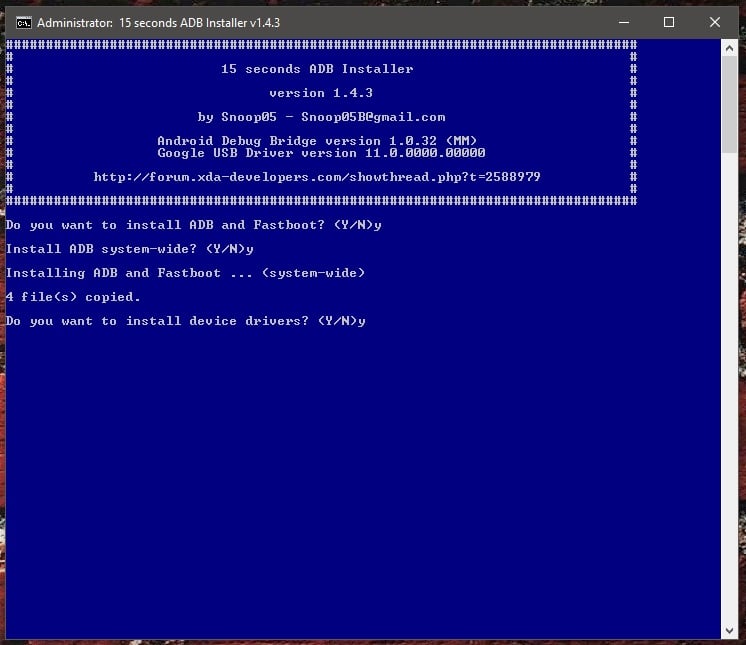
“Official TWRP 3.0.2-0 for LeEco Max 2 x820” — Download this custom recovery and Snoop05’s “adb setup“. Install adb and fastboot to your system if you haven’t done it before, choosing “Yes” in every step including “install device drivers” too.
Put your Max 2 into fastboot mode while pressing volume “-“ and powering up.
Unzip twrp to any folder you want, go to that folder, right click holding down “Shift” key on your keyboard and choose “Open command window here“.
Type :
fastboot flash recovery twrp-3.0.2-0-x2.img (copy from here and paste to command window > right click > paste )
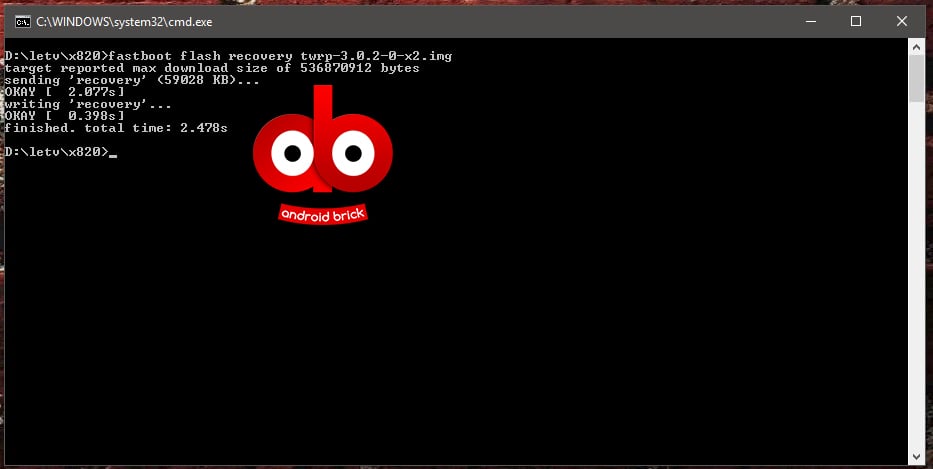
And press enter. Reboot your phone into recovery while pressing volume “+” button and long pressing power button till it reboots. You will see TWRP screen, thick “Never show this screen during boot again” and “Swipe to Allow Modifications”.
That’s all folks. You are ready to flash any stock or custom rom to your LeEco Max 2 now. Here is the latest 5.8.019S (Stable) official rom, it’s multilanguage and Google preinstalled.
See you in the next guide.


