Dealing with a write-protected SD card can be frustrating, but fear not, there are solutions. Encountering that error message, “The disk is write-protected,” can seem like hitting a dead end, especially if you’re not well-versed in computer troubleshooting. However, in this comprehensive guide, we will make the process easy for you.
We’ll walk you through five straightforward methods to remove that pesky write protection and format your SD card with ease. But that’s not all, we’ll also delve into the realm of data recovery, showing you how to effortlessly retrieve lost files from your now-accessible SD card.
Preparing to Format a Write-Protected SD Card
Formatting a write-protected SD card requires a systematic approach, typically divided into two key steps. One must attempt various methods to eliminate the write protection barrier, followed by utilizing Windows’ built-in tools such as Command Prompt for formatting. However, before diving into these steps, it’s crucial to undertake some essential preparations.
Firstly, conducting a thorough virus scan is highly recommended, as viruses and malware can often be the hidden culprits behind write protection issues, aiming to thwart users from modifying or deleting infected files.
Additionally, anticipating data loss during the formatting process is prudent. To mitigate this risk, consider using a data recovery software like Tenorshare 4DDiG. Renowned for its high success rate and user-friendly interface, 4DDiG simplifies the retrieval process, making it accessible even to those less experienced with computers. By following a few straightforward steps within the tool, users can effortlessly recover lost files from their formatted SD card.
Disabling Write Protection on an SD Card
Turning Off the Physical Write Protection Switch
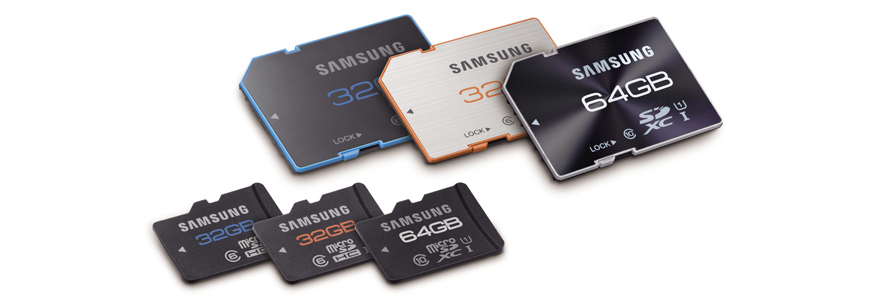
Removing write protection from an SD card is a simple task, especially if you’re familiar with the physical attributes of your storage device. Many SD cards are equipped with a small yet significant feature—a physical switch located on the side. This switch serves as a safeguard against inadvertent alterations or erasures of data stored on the card. Before attempting to format a write-protected SD card, it’s essential to ensure that this switch is set to the unlocked position. By doing so, you effectively disable the write protection mechanism and can now proceed with formatting or modifying the contents of the card as needed.

Remove Write Protection on SD Cards Using Diskpart
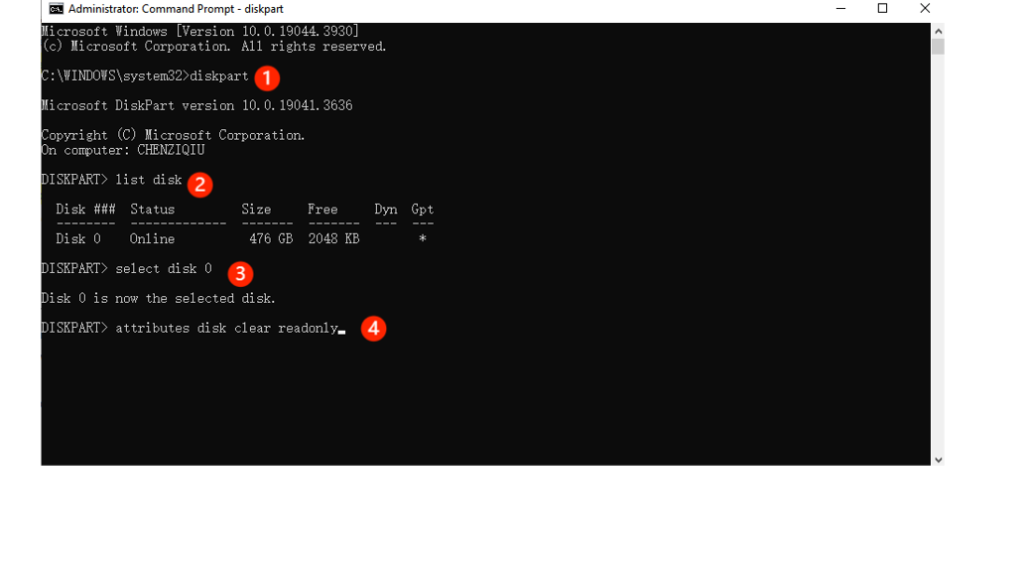
Removing write protection from an SD card can be done by using Diskpart tool, particularly suitable for those comfortable navigating a command-line interface. Here’s a step-by-step guide to assist you through the process:
Connect the SD Card: Connect the write-protected SD card to your computer.
Access Command Prompt (Admin): Press “Win + X” on your keyboard and select “Command Prompt (Admin)” from the options presented.
Launch Diskpart: Type the command “diskpart” and hit Enter to initiate the Diskpart tool.
List Disks: Continue by typing “list disk” and pressing Enter. This action will display a list of available disks on your system.
Select the SD Card: Identify your SD card from the list and note its corresponding number. Then, input “select disk #” (replace “#” with the appropriate number) and press Enter.
Clear Write Protection: Finally, to remove the write protection, type “attributes disk clear readonly” and press Enter.
By following these step-by-step instructions, you can effectively eliminate write protection from your SD card using the Diskpart tool, granting you the freedom to modify or format the card as needed.

Utilize Registry Editor to Disable Write Protection
While using the registry editor to remove write protection from an SD card is not recommended for those unfamiliar with technical intricacies, it can be accomplished with caution and precision. Here’s a step-by-step guide to navigating this process safely:
Access Registry Editor: Begin by pressing “Win + R” to open the Run dialog box. Type “regedit” and hit “Enter” to launch Registry Editor.

Navigate to the Key: Within Registry Editor, navigate to the following path: HKEY_LOCAL_MACHINE\SYSTEM\CurrentControlSet\Control\StorageDevicePolicies.
Note: If the StorageDevicePolicies key is absent, create it by right-clicking on “Control,” selecting “New,” then “Key,” and naming the new key “StorageDevicePolicies.”
Create DWORD Value: Inside the StorageDevicePolicies key, right-click in the right-hand pane, select “New,” then “DWORD (32-bit) Value.” Name the new value “WriteProtect.”
Modify Value Data: Double-click on the WriteProtect value and set its data to 0, effectively disabling write protection.
While these steps offer a method to remove write protection, exercise caution, as improper modifications within the registry editor could lead to system instability or failure. If unsure, it’s advisable to seek assistance from a professional to avoid potential complications. By following these instructions diligently, you can safely navigate the process of removing write protection from your SD card using the registry editor.
Consider Utilizing Third-Party Software
If conventional methods have failed to remove the write protection from your SD card, turning to third-party tools could offer a viable solution. Here’s a selection of popular options, ranging from free to paid, to consider exploring:
SD Memory Card Formatter: Specifically designed for formatting SD cards, this tool provides a straightforward approach to resolving write protection issues.
EaseUS Partition Master: Offering comprehensive partition management capabilities, this software includes features to address write protection on SD cards alongside other functionalities.
MiniTool Partition Wizard: Renowned for its user-friendly interface and robust partition management tools, this software offers solutions for various storage-related issues, including write protection on SD cards.
Rufus: While primarily known as a tool for creating bootable USB drives, Rufus also provides options for dealing with write protection on SD cards.
ChipGenius: With its focus on identifying flash drive controllers, ChipGenius can sometimes assist in diagnosing and potentially resolving write protection problems on SD cards.
Exploring these third-party tools presents an alternative avenue for tackling write protection issues on SD cards, offering a diverse range of options to suit different user preferences and needs.
Formatting a Write-Protected SD Card
Once the write protection has been removed from your SD card, you have three options for formatting it.
Format an SD Card Using File Explorer
Many users find formatting a write-protected SD card through File Explorer to be a preferred method due to its simplicity and user-friendly interface. Here’s a step-by-step guide to walk you through the process:
Insert the SD Card: Begin by inserting your SD card into the card reader slot on your computer.
Open File Explorer: Navigate to the File Explorer icon in the taskbar and click on it to open the application. Then, locate the SD card under “This PC” or “Computer” in the left sidebar.
Access Formatting Options: Right-click on the SD card icon and select “Format” from the menu options presented.
Configure Formatting Settings: In the formatting window, you can choose the desired file system (FAT32, exFAT, or NTFS), allocate unit size, and provide a volume label if desired.
Initiate Formatting: Once you’ve configured the settings to your preference, click on the “Start” button to initiate the formatting process.
By following these straightforward steps, you can easily format your write-protected SD card using File Explorer, ensuring it’s ready for use according to your specifications.
Format an SD Card Using Disk Management
Formatting a write-protected SD card is often necessary to address various issues such as file system errors or corrupted data. Disk Management provides a convenient method to accomplish this task efficiently. Here’s a step-by-step guide:
Access Disk Management: Begin by pressing “Win + X” on your keyboard and selecting “Disk Management” from the menu options presented.
Locate the SD Card: Within Disk Management, locate your SD card from the list of available drives.
Initiate Formatting: Right-click on the SD card and choose the “Format” option from the context menu.
Configure Formatting Settings: In the formatting dialogue box, select the desired file system for the SD card and click “OK” to proceed.
By following these steps, you can easily format your write-protected SD card using Disk Management, ensuring it’s prepared for use without any issues. Whether you’re resolving file system errors or clearing corrupted data, Disk Management offers a straightforward solution to effectively manage your storage devices.
Format an SD Card Using Diskpart
In addition to its capability to remove write protection, Diskpart proves to be a versatile tool for various operations, including formatting. Here’s a step-by-step guide on how to format a write-protected SD card using Diskpart:
Access Diskpart: Open the Diskpart tool as previously described in your system.
Identify the SD Card: Type “list disk” to display a list of available disks and their corresponding numbers. Identify your SD card’s disk number from the list.
Select the SD Card: Enter “select disk X” (replace X with your SD card’s disk number) to choose the SD card.
Clean the Disk: Execute the command “clean” to remove all existing partitions from the SD card.
Create a Primary Partition: Type “create partition primary” to initiate the creation of a primary partition on the SD card.
Format the Partition: Finally, execute the command “format fs=FAT32 quick” (replace FAT32 with exFAT or NTFS as needed) to format the partition swiftly with the desired file system.
By following these steps meticulously, users can effectively format a write-protected SD card using Diskpart, unlocking its full potential for storage and usage. Diskpart’s versatility makes it a valuable tool for managing various disk-related tasks, offering users a seamless and efficient solution for their storage management needs.
In this article, we have covered the process of removing write protection from an SD card and subsequently formatting it for optimal usage. Once the write protection hurdle is overcome, your SD card is poised for action. However, if the need arises to format a write-protected SD card, it’s prudent to take precautionary measures.
We strongly advocate backing up crucial files beforehand to safeguard against any potential data loss during the formatting process. By adhering to these recommendations, users can navigate the journey of preparing their SD cards for use with confidence, ensuring their data remains secure and accessible.


