Virtual data has become quite essential, and without any backup, you’re already on the brink of losing it. Well, if your use case matches, then it’s worth giving a shot at the Stellar Data Recovery for MacOS utility. With the successful launch of the Windows Data Recovery Tool, Stellar is here with a utility for Mac. The new Stellar Data Recovery for Mac is fully compatible with all the new and old versions of the OS. Support for new macOS versions and fixes for present iterations keeps improving with each update. We are reviewing the latest version of Stellar Mac Data Recovery.

There could be several instances where the user lost important documents or other files related to work. The reason could be the presence of malware, adware, or inadvertently deleting the files. In such a case, the recovery tools could become a lifesaver. Let’s see how the Stellar Data Mac Recovery tool fares in the actual recovery process.
Installation
Stellar Data Recovery for Mac can be installed easily by dragging and dropping the file into the Apps folder. You should wait for a few seconds for the installation process to complete. The user should open the app and enter the product key if they have already purchased it. Now, you’re ready to start the recovery process.
Our Machine Environment
We used the MacBook Air M2 with 8GB of RAM and a 256GB SSD to test the software. It is running on Mac OS 14.1 Sonoma. We have tested the software by deleting some files on the MacBook, and then recovering them using the Stellar Data Recovery Software. It can be used on different SSDs, HDDs, and flash drives formatted with APFS/HFS+/NTFS/ExFAT.
Why We Recommend Stellar Data Mac Recovery Tool
There are several reasons and features that are quite useful while recovering data from the MacBook or any external drive. We are listing some of these features, which users may also find useful:
Compatible with multiple drives and formats: The Stellar Data Mac Recovery tool is compatible with almost all storage drives, like SSDs, HDDs, and NVMes formatted with APFS/HFS+/NTFS/ExFAT. This vast support improves the compatibility and obviously enhances the use cases while using it on MacOS.
Ability to Recover Non-Booting Macs: Using the Mac’s recovery mode, the user can recover non-booting MacBook Air/Pro, Mac Mini, and other MacOS devices. The smooth recovery process further improves the recovery process.
Ability to Recover Without Security Integrity Protection: MacOS is known for its security and data protection. The layer to resist any data theft, which is known as security protection, needs to be disabled in order to recover from traditional recovery tools. but, Stellar Data Recovery offers recovery protection without disabling SIP. It uses full disk access permission to scan and recover the selected files or data types.
Pause and Resume Scan: With the feature to resume and pause, the user can easily manage the Mac resources more effectively. While using the Mac, and performing CPU-intensive tasks, the user can easily pause the scan and continue the task. This way, the user can do any work simultaneously, and even save time. The Stellar Data Recovery tool possesses this kind of convenience feature.
Additional Features:
Drive health monitoring and cloning: It can improve the performance, health, and SMART attributes of all the drives connected to the Mac.
Disk imaging: The technique improves and enhances the speed of recovery.
Guide to Recovering Mac Data Using Stellar Mac Data Recovery Utility
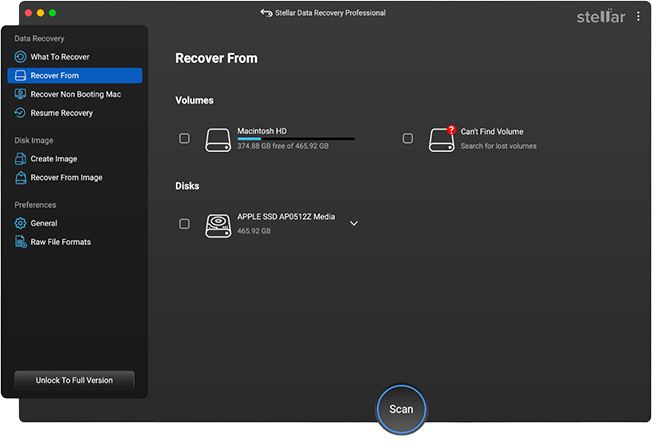
There are some preferences that the user should set before starting the recovery process. Let’s dive into the steps, and see the preferences:


- Select the type of file the user would want to recover: documents, emails, videos, videos, photos, or Recover Everything.
- Upon pressing Next, the user should select Drive – Internal Local Drive, External SSD, HDD, or Flash Drive. Now, press Scan.
- The process will start, and the progress bar indicator will show the total progress. (Note: The user can switch between preview functionality for fast scanning.).
- Depending on the size of the location, it will take time. For example, in our case, the MacBook M2 Air took around 6-7 minutes to scan 256GB of SD storage. (Note: the time may increase if you scan a larger than 256GB storage device.).
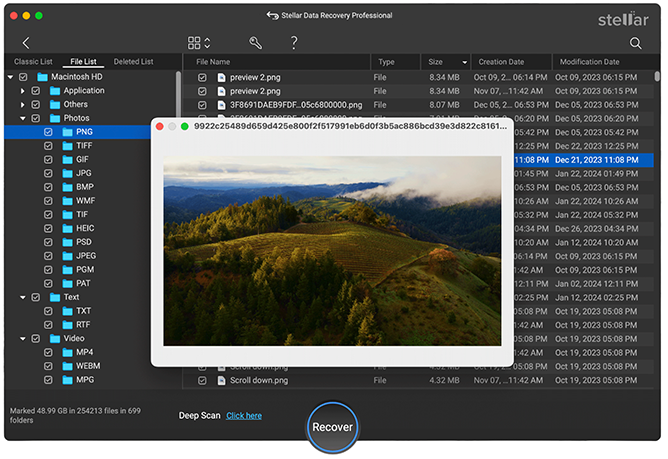
- Upon completion, filter the file or folder you would like to recover.
- Now, the selected file or folder will be recovered, and the duration may vary depending on the size.
Note: There are certain settings that the user would want to configure upon completion, like sorting the list as per file type or size. The user can also preview the files before resizing them.
Verdict:
Stellar Data Mac Recovery is quite a useful tool for restoring inadvertently deleted files and folders. The efficacy of the app to restore files is quite high compared to the competition. Given the price, it is purely value for money if we compare it with competition in the market. The tool managed to recover ~90% of the files that were deleted.
Pricing:
The pricing starts at $89.99, which brings the ability to restore unlimited files. It can recover persistently deleted files, and recover data from non-bootable Macs.
In total, there are three different plans: professional, premium, and technician. The pricing starts at $89.99 for the Professional plan, the Premium plan costs around $99.99, and the Technician plan is available at $199.
In the Professional plan, the company offers permanently deleted data, and data from crashed or non-booting Macs. The plan also offers the ability to recover from the time machine and Bootcamp partition.
The Premium Plan, which retails for $99.99, offers the ability to repair corrupt photos and videos and perform single-click bulk repairs on photos and videos.
The last and most powerful plan is Technician, which offers the ability to recover virtual machines and also supports Linux data recovery from the Linux File System.
Overall, it is a good choice among the data recovery tools for macOS devices. For more details and instructions about Mac data recovery software, please check out the article here.
Related:
- Review: Stellar Windows Data Recovery – Your Data’s Second Chance
- Get Redmi K70 Pro for discounted price of $499
- Xiaomi Band 8 Genshin Impact custom edion get a huge discount.
- Unlock Savings: Discount on Every Giztop Product under the New Year Sale
- How to hide WhatsApp chats without archive


